Thursday, April 28, 2016

Twine Cacti

For my Whisker Graphics project for the month of May (technically not May yet, but moved up because of an upcoming blog hop), I tried my hand at making some twine-wrapped cacti!

Cacti are a common (and popular) icon of the desert southwest where I live, and I made three variations:

Twine Cacti | shirley shirley bo birley Blog

I started with 30mm pipe cleaner (it's thicker than the normal kind you might find at the craft store), which I bought on Amazon.

Here's a how-to video:


See this project on the Whisker Graphics blog here: Creative Cactus.

Monday, April 25, 2016

Tic-Tac-Toe Challenge 8 Guest Post

I'm over on the Tic-Tac-Toe Challenge blog today with a couple of cards for the current challenge, Challenge Eight.

Tic-Tac-Toe Challenge 8

I made two cards using the top row of 3 of a kind, enamel accents, and square card. Here are a couple of sneaks, but head over to the Tic-Tac-Toe Challenge blog for all the pictures and details!

Tic-Tac-Toe Challenge 8 Guest Post | shirley shirley bo birley Blog

Friday, April 22, 2016

Grid Thx Card

Quick card that I made a while ago and never posted:

Grid Thx Card | shirley shirley bo birley Blog

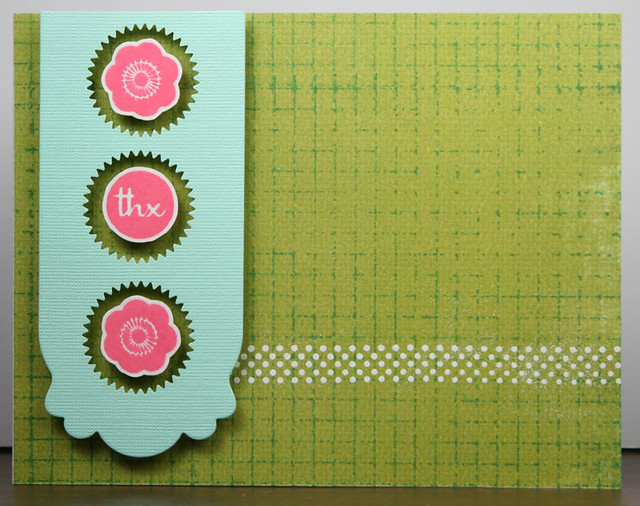
For this card, I stamped the grid on a piece of patterned paper (it looks solid, but it has a slight texture pattern). I also stamped the dotted strip with VersaMark and heat embossed with white powder.

I die cut the robin's egg blue strip and used a starburst punch on the strip in a column of three. I stamped the flowers and sentiment with Distress Ink, and hand-cut those out. Lastly, I adhered the die-cut strip and hand-cut shapes to the stamped card base using foam dots to give the card some dimension.

If I recall correctly, I think I ended up giving this to a neighbor to thank them for helping us out.

Monday, April 11, 2016

Congrats To The New Couple Card

I made this card a few years ago, but never posted it. It finally got put to use last week, so now I'm getting it up.

Congrats To The New Couple Card | shirley shirley bo birley Blog

The male, female, and heart are stamped on the inside of the card so that it peeks through the circle cut out of the front. I masked off part of the front so that I could stamp the floral background (I think it is Hero Arts). I heat embossed a tag stamp on the front with silver powder, and then hand-cut the middle out. The sentiment is from Papertrey Ink, and I also heat embossed that with silver powder.

Friday, April 8, 2016

Strappy and Lace-up Flats

I've been seeing variations of strappy and lace-up flats recently and I'm infatuated because it reminds me of one of my favorite pairs of flats that I used to have, the String Bean flat from Rocket Dog. At the time I bought those Rocket Dogs, I was in college, and the shoes cost around $30, which I felt were expensive.

That style of Rocket Dogs isn't sold anymore - I know because I've tried to look before. I did, however, find many cute strappy and lace-up flats at various price points. I almost pulled the trigger on getting the Nine West pair, but was talked off the ledge after having a conversation with Greg about need versus want - a good reminder; we often have that conversation in the other direction as well.

Strappy and Lace-Up Flats | shirley shirley bo birley Blog

  1. Coach Justine Flat: $195.00
  2. Nine West Signmeup Gladiator Flat: $89.00
  3. Candie's Ghillie Flats: $34.99
  4. Topshop 'Fancy' Pointy Toe Ghillie Flat: $48.00
  5. Topshop Freya Three Strap Pointed Shoe: $35.00
  6. Topshop Fleur Three Strap Round Toe Shoe: $45.00
  7. Jessica Simpson Mandayss Ballet Flat: $39.99

Black, by the way, is my go-to accessory color, so that is the only color of shoe that I really ever consider. Not as fun, but more versatile so that I can use accessories for both work and the weekend!

Tuesday, April 5, 2016

Twine-wrapped Utensil Holder

For my Whisker Graphics project this month, I used several colors of solid Divine Twine to make this colorful utensil holder:

Twine-wrapped Utensil Holder | shirley shirley bo birley Blog

I didn't have pencils on hand (at least not the natural wood ones I wanted), so I used some pretty chopsticks as props instead!

Here's a short how-to video, with instructions below:


INSTRUCTIONS:
  1. Find a container to re-purpose. In my case, I chose to use an old Almond Roca container.
  2. Gather a paint brush and white acrylic paint to cover up the label. I think it would've been okay not painting over, because the twine will cover all of it, but I didn't want to take the chance that the label might show through.
  3. Paint two coats of white acrylic paint over the label and let dry.
  4. Pick colors of twine.
  5. Wrap twine around the container, using little drops of glue to secure the beginning and ends of each strand of twine.

Blog Design by Get Polished | © 2018 shirley shirley bo birley blog